Hello folks, Today I will explain you regarding Label control in WPF. I have already explained you regarding how could we create new project of WPF and basic structure of WPF project.
Let’s try to understand regarding Label by using examples:

1. Create a Label
A Label is widely used WPF Control in XAML.
< Label Content="Hello"/>
2. Label With Font Styling
Below are the basic property of Label for Fonts:
- FontSize: Could set size of Font used in Label.
- FontWeight: Set Font size like Thin, ExtraLight, Light, Normal, Medium etc.
- FontStyle: Set Font style like Italic, Normal, Oblique.
- FontFamily: Set Font Family.
 <!--Example - 2 for Label with font-->
 <Label FontSize="50" FontWeight="ExtraLight" FontStyle="Italic" FontFamily="SketchFlow Print" Content="Label with font"/>
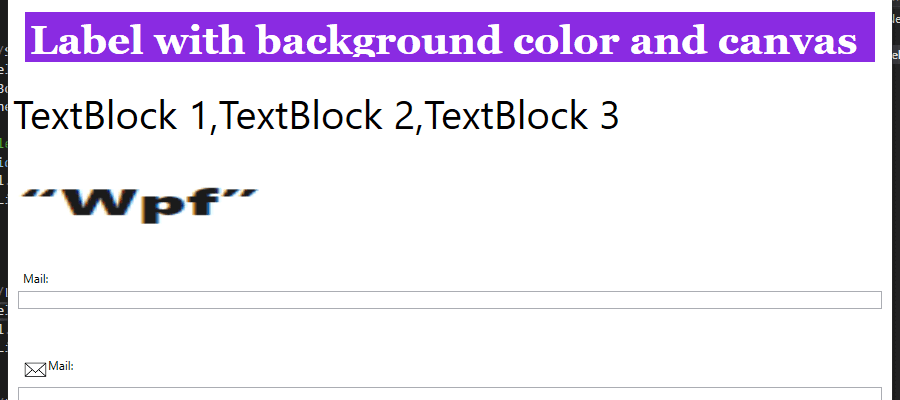
3. Label with background color and canvas
Label’s Background and Foreground properties set the color of background and foreground of Label. Below is the code snippet for Background and Foreground along with Alignment property of Label.
<!--Example - 3 for Label with background color and canvas-->
<Label Grid.Row="1" Content="Label with background color and canvas"  Width="850" Height="50" Canvas.Left="10" Canvas.Top="100" FontSize="40"
        FontFamily="Georgia" FontWeight="Bold" Background="BlueViolet" Foreground="White" VerticalAlignment="Center" HorizontalAlignment="Center" />
4. Adding Controls to a WPF Label
We can use different WPF controls as a content in Label control as shown below code snippet.
<!--Example - 4 for Adding Controls to a WPF Label -->
<Label Canvas.Left="10" Canvas.Top="50" Grid.Row="2">
    <StackPanel Orientation="Horizontal">
        <TextBlock Text="TextBlock 1," FontSize="40"/>
        <TextBlock Text="TextBlock 2," FontSize="40"/>
        <TextBlock Text="TextBlock 3" FontSize="40" />
    </StackPanel>
</Label>
5. Set Image as Background in a Label WPF
We can set background image as a background of Label using Background property of Label and ImageBrush.
<!--Example - 5 Set Image as Background in a Label WPF -->
<Label  Grid.Row="3">
    <Label.Background>
        <ImageBrush ImageSource="WPF-image.PNG" />
    </Label.Background>
</Label>
6. Access keys/mnemonics in WPF Label
In Windows, it’s common practice that you can access controls without using mouse by holding down the [Alt] key and then pressing a any character which corresponds to the control that you wish to access. The character to press will be highlighted when you hold down the [Alt] key. TextBlock controls doesn’t support this functionality, but the Label does, so for control labels.
<!--Example - 6 Access keys/mnemonics in WPF Label -->
<StackPanel Margin="10"  Grid.Row="4">
    <Label Content="_Mail:" Target="{Binding ElementName=txtMail}" />
    <TextBox Name="txtMail" />
</StackPanel>
7. Access keys/mnemonics with Icon in WPF Label
Same as above example we can use image along with Access keys/mnemonics Label control in WPF as shown in below example
<!--Example - 7 Access keys/mnemonics with Icon in WPF Label -->
<StackPanel Margin="10"  Grid.Row="5">
    <Label Target="{Binding ElementName=txtMail2}" >
        <StackPanel Orientation="Horizontal">
            <Image Source="Email-icon.png" Width="25" Height="25" />
            <AccessText Text="M_ail:" />
        </StackPanel>
    </Label>
    <TextBox Name="txtMail2" />
</StackPanel>
8. Format a WPF Label using background and Gradient
The Background and Foreground properties of the Label set the background and foreground colors of a Label. You may use any brush to fill the border. The following code snippet uses linear gradient brushes to draw the background and foreground of a Label.
<!--Example - 8 Format a WPF Label using background and Gradient -->
<Label Grid.Row="6">
    <Label.Background>
        <LinearGradientBrush StartPoint="0,0" EndPoint="1,1">
            <GradientStop Color="Pink" Offset="0.1" />
            <GradientStop Color="Blue" Offset="0.25" />
            <GradientStop Color="Green" Offset="0.75" />
            <GradientStop Color="Red" Offset="1.0" />
        </LinearGradientBrush>
    </Label.Background>
    <Label.Foreground>
        <LinearGradientBrush StartPoint="0,0" EndPoint="1,1">
            <GradientStop Color="Orange" Offset="0.25" />
            <GradientStop Color="Green" Offset="1.0" />
        </LinearGradientBrush>
    </Label.Foreground>
</Label>
9. Full source code with all examples
<Window x:Class="WpfLabel.MainWindow"
        xmlns="http://schemas.microsoft.com/winfx/2006/xaml/presentation"
        xmlns:x="http://schemas.microsoft.com/winfx/2006/xaml"
        xmlns:d="http://schemas.microsoft.com/expression/blend/2008"
        xmlns:mc="http://schemas.openxmlformats.org/markup-compatibility/2006"
        xmlns:local="clr-namespace:WpfLabel"
        mc:Ignorable="d"
        Title="Label Example in WPF" Height="650" Width="900">
    <Grid>
        <Grid.RowDefinitions>
            <RowDefinition Height="*"/>
            <RowDefinition Height="*"/>
            <RowDefinition Height="*"/>
            <RowDefinition Height="*"/>
            <RowDefinition Height="*"/>
            <RowDefinition Height="*"/>
            <RowDefinition Height="*"/>
        </Grid.RowDefinitions>

        <!--Example - 2 for Label with font-->
        <Label FontSize="50" FontWeight="ExtraLight" FontStyle="Italic" FontFamily="SketchFlow Print" Content="Label with font"/>

        <!--Example - 3 for Label with background color and canvas-->
        <Label Grid.Row="1" Content="Label with background color and canvas"  Width="850" Height="50" Canvas.Left="10" Canvas.Top="100" FontSize="40"
        FontFamily="Georgia" FontWeight="Bold" Background="BlueViolet" Foreground="White" VerticalAlignment="Center" HorizontalAlignment="Center" />

        <!--Example - 4 for Adding Controls to a WPF Label -->
        <Label Canvas.Left="10" Canvas.Top="50" Grid.Row="2">
            <StackPanel Orientation="Horizontal">
                <TextBlock Text="TextBlock 1," FontSize="40"/>
                <TextBlock Text="TextBlock 2," FontSize="40"/>
                <TextBlock Text="TextBlock 3" FontSize="40" />
            </StackPanel>
        </Label>

        <!--Example - 5 Set Image as Background in a Label WPF -->
        <Label  Grid.Row="3">
            <Label.Background>
                <ImageBrush ImageSource="WPF-image.PNG" />
            </Label.Background>
        </Label>

        <!--Example - 6 Access keys/mnemonics in WPF Label -->
        <StackPanel Margin="10"  Grid.Row="4">
            <Label Content="_Mail:" Target="{Binding ElementName=txtMail}" />
            <TextBox Name="txtMail" />
        </StackPanel>

        <!--Example - 7 Access keys/mnemonics with Icon in WPF Label -->
        <StackPanel Margin="10"  Grid.Row="5">
            <Label Target="{Binding ElementName=txtMail2}" >
                <StackPanel Orientation="Horizontal">
                    <Image Source="Email-icon.png" Width="25" Height="25" />
                    <AccessText Text="M_ail:" />
                </StackPanel>
            </Label>
            <TextBox Name="txtMail2" />
        </StackPanel>

        <!--Example - 8 Format a WPF Label using background and Gradient -->
        <Label Grid.Row="6">
            <Label.Background>
                <LinearGradientBrush StartPoint="0,0" EndPoint="1,1">
                    <GradientStop Color="Pink" Offset="0.1" />
                    <GradientStop Color="Blue" Offset="0.25" />
                    <GradientStop Color="Green" Offset="0.75" />
                    <GradientStop Color="Red" Offset="1.0" />
                </LinearGradientBrush>
            </Label.Background>
            <Label.Foreground>
                <LinearGradientBrush StartPoint="0,0" EndPoint="1,1">
                    <GradientStop Color="Orange" Offset="0.25" />
                    <GradientStop Color="Green" Offset="1.0" />
                </LinearGradientBrush>
            </Label.Foreground>
        </Label>
    </Grid>
</Window>